制作网站需要学什么软件有哪些seo博客网站

一、说明
在这篇文章中,我们将展示如何构建计算机视觉模型并准备将其部署在移动和嵌入式设备上。有了这些知识,您就可以真正将脚本部署到日常使用或移动应用程序中。
教程概述:
- 介绍
- 在 TensorFlow 中构建模型
- 将模型转换为 TensorFlow Lite
- 训练后量化
二、前提知识
上次,我们展示了如何使用迁移学习来提高模型性能。但是,当我们可以在智能手机或其他嵌入式设备上使用我们的模型时,为什么我们只使用我们的模型来预测计算机上猫或狗的图像呢?
TensorFlow Lite 是 TensorFlow 针对移动和嵌入式设备的轻量级解决方案。它使我们能够在移动设备上以低延迟快速运行机器学习模型,而无需访问服务器。
它可以通过 C++ API 在 Android 和 iOS 设备上使用,也可以与 Android 开发人员的 Java 包装器一起使用。
三、 在 TensorFlow 中构建模型
在开始使用 TensorFlow Lite 之前,我们需要训练一个模型。我们将使用台式计算机或云平台等更强大的机器从一组数据训练模型。然后,可以导出该模型并在移动设备上使用。
让我们首先准备训练数据集。我们将使用 wget .download 命令下载数据集。之后,我们需要解压缩它并合并训练和测试部分的路径。
import os
import wget
import zipfile wget.download("https://storage.googleapis.com/mledu-datasets/cats_and_dogs_filtered.zip")
100% [........................................................................] 68606236 / 68606236
Out[2]:
'cats_and_dogs_filtered.zip'
with zipfile.ZipFile("cats_and_dogs_filtered.zip","r") as zip_ref:zip_ref.extractall()base_dir = 'cats_and_dogs_filtered'train_dir = os.path.join(base_dir, 'train')
validation_dir = os.path.join(base_dir, 'validation')
接下来,让我们导入所有必需的库并构建我们的模型。我们将使用一个名为MobileNetV2的预训练网络 ,该网络是在 ImageNet 数据集上进行训练的。之后,我们需要冻结预训练层并添加一个名为GlobalAveragePooling2D 的新层,然后是具有 sigmoid 激活函数的密集层。我们将使用图像数据生成器来迭代图像。
base_model = MobileNetV2(input_shape=(224, 224, 3),include_top=False,weights='imagenet')base_model.trainable = False
model = Sequential([base_model,GlobalAveragePooling2D(),Dense(1, activation='sigmoid')])
model.compile(loss='binary_crossentropy',optimizer=RMSprop(lr=0.001),metrics=['accuracy'])train_datagen = ImageDataGenerator(rescale=1./255)
val_datagen = ImageDataGenerator(rescale=1./255)train_generator = train_datagen.flow_from_directory(train_dir,target_size=(224, 224),batch_size=32,class_mode='binary')validation_generator = val_datagen.flow_from_directory(validation_dir,target_size=(224, 224),batch_size=32,class_mode='binary')
Found 2000 images belonging to 2 classes.
Found 1000 images belonging to 2 classes.
history = model.fit(train_generator,epochs=6,validation_data=validation_generator,verbose=2)Train for 63 steps, validate for 32 steps Epoch 1/6 63/63 - 470s - loss: 0.3610 - accuracy: 0.8515 - val_loss: 0.1664 - val_accuracy: 0.9460 Epoch 2/6 63/63 - 139s - loss: 0.2055 - accuracy: 0.9210 - val_loss: 0.2065 - val_accuracy: 0.9150 Epoch 3/6 63/63 - 89s - loss: 0.1507 - accuracy: 0.9470 - val_loss: 0.1294 - val_accuracy: 0.9560 Epoch 4/6 63/63 - 81s - loss: 0.1342 - accuracy: 0.9510 - val_loss: 0.1733 - val_accuracy: 0.9350 Epoch 5/6 63/63 - 80s - loss: 0.1205 - accuracy: 0.9555 - val_loss: 0.1684 - val_accuracy: 0.9390 Epoch 6/6 63/63 - 82s - loss: 0.1079 - accuracy: 0.9620 - val_loss: 0.1418 - val_accuracy: 0.9450
四、 将模型转换为 TensorFlow Lite
在 TensorFlow 中训练深度神经网络后,我们可以将其转换为 TensorFlow Lite。
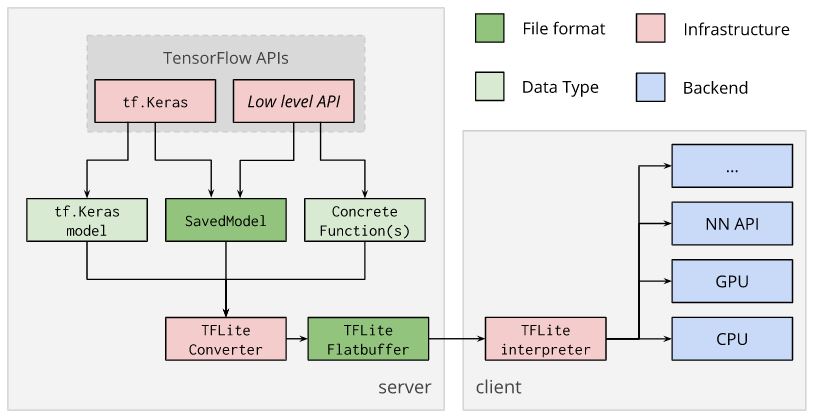
这里的想法是使用提供的 TensorFlow Lite 转换器来转换模型并生成 TensorFlow Lite FlatBuffer文件。此类文件的扩展名是.tflite。
可以直接从经过训练的 tf.keras 模型、保存的模型或具体的 TensorFlow 函数进行转换,这也是可能的。
converter = tf.lite.TFLiteConverter.from_keras_model(model)
tflite_model = converter.convert()open("converted_model.tflite", "wb").write(tflite_model)
转换后,FlatBuffer 文件可以部署到客户端设备。在客户端设备上,它可以使用 TensorFlow Lite 解释器在本地运行。
https://www.tensorflow.org/lite/convert
让我们看看如何使用TensorFlow Lite Interpreter直接从 Python 运行该模型。
interpreter = tf.lite.Interpreter(model_content=tflite_model)
interpreter.allocate_tensors()我们可以通过运行get_input_details和get_output_details函数来获取模型的输入和输出详细信息。我们还可以调整输入和输出的大小,这样我们就可以对整批图像进行预测。
input_details = interpreter.get_input_details()
output_details= interpreter.get_output_details()print("== Input details ==")
print("shape:", input_details[0]['shape'])
print("type:", input_details[0]['dtype'])
print("\n== Output details ==")
print("shape:", output_details[0]['shape'])
print("type:", output_details[0]['dtype'])
== Input details == shape: [ 1 224 224 3] type: <class 'numpy.float32'>== Output details == shape: [1 1] type: <class 'numpy.float32'>
interpreter.resize_tensor_input(input_details[0]['index'], (32, 224, 224, 3))
interpreter.resize_tensor_input(output_details[0]['index'], (32, 5))
interpreter.allocate_tensors()input_details = interpreter.get_input_details()
output_details= interpreter.get_output_details()print("== Input details ==")
print("shape:", input_details[0]['shape'])
print("type:", input_details[0]['dtype'])
print("\n== Output details ==")
print("shape:", output_details[0]['shape'])
print("type:", output_details[0]['dtype'])
== Input details == shape: [ 32 224 224 3] type: <class 'numpy.float32'>== Output details == shape: [32 1] type: <class 'numpy.float32'>
接下来,我们可以生成一批图像,在我们的例子中为 32 个,因为这是之前图像数据生成器中使用的数量。
使用 TensorFlow Lite 进行预测的第一步是设置模型的输入,在我们的示例中是一批 32 张图像。设置输入张量后,我们可以调用invoke 命令来调用解释器。输出预测将通过调用get_tensor命令获得。
我们来对比一下 TensorFlow Lite 模型和 TensorFlow 模型的结果。它们应该是相同的。我们将使用np.testing.assert_almost_equal函数来完成此操作。如果结果在一定的小数位数内不相同,则会引发错误。
mage_batch, label_batch = next(iter(validation_generator))
interpreter.set_tensor(input_details[0]['index'], image_batch)
interpreter.invoke()
tflite_results = interpreter.get_tensor(output_details[0]['index'])tf_results = model.predict(image_batch)for tf_result, tflite_result in zip(tf_results, tflite_results):np.testing.assert_almost_equal(tf_result, tflite_result, decimal=5)
到目前为止没有错误,所以它向我们表明此转换已成功完成。但这是有阶级概率的。让我们编写一个函数将其转换为类。该函数将执行与 TensorFlow 中内置函数相同的操作。此外,我们还将展示这些预测。红色将显示与主 TensorFlow 模型不同的预测,蓝色图像将显示两个模型做出相同的预测。作为标签,我们将显示 TensorFlow Lite 模型的预测。
def predict_classes(tf_model, tf_lite_interpreter, x):tf_lite_interpreter.set_tensor(input_details[0]['index'], x)tf_lite_interpreter.invoke()tflite_results = tf_lite_interpreter.get_tensor(output_details[0]['index'])tf_results = model.predict_classes(x)if tflite_results.shape[-1] > 1:tflite_results = tflite_results.argmax(axis=-1)else:tflite_results = (tflite_results > 0.5).astype('int32')plt.figure(figsize=(12,10))for n in range(32):plt.subplot(6,6,n+1)plt.subplots_adjust(hspace = 0.3)plt.imshow(image_batch[n])color = "blue" if tf_results[n] == tflite_results[n] else "red"plt.title(tflite_results[n], color=color)plt.axis('off')_ = plt.suptitle("Model predictions (blue: same, red: different)")predict_classes(model, interpreter, image_batch)
五、训练后量化
这非常简单,但某些模型并未针对在低功耗设备上运行进行优化。因此,为了解决这个问题,我们需要进行量化。
训练后量化是一种转换技术,可以减小模型大小,同时改善 CPU 和硬件加速器延迟,而模型精度几乎没有下降。
下表显示了三种技术及其优点,以及可以运行该技术的硬件。
| 技术 | 好处 | 硬件 |
|---|---|---|
| 权重量化 | 缩小 4 倍,加速 2-3 倍,准确度提高 | 中央处理器 |
| 全整数量化 | 缩小 4 倍,加速 3 倍以上 | CPU、边缘TPU等 |
| Float16 量化 | 体积缩小 2 倍,具有潜在的 GPU 加速能力 | 中央处理器/图形处理器 |
让我们看看它是如何进行权重量化的,这是默认的。
converter = tf.lite.TFLiteConverter.from_keras_model(model)
converter.optimizations = [tf.lite.Optimize.DEFAULT]
tflite_quant_model = converter.convert()open("converted_model.tflite", "wb").write(tflite_quant_model)interpreter = tf.lite.Interpreter(model_content=tflite_quant_model)
interpreter.allocate_tensors()
input_details = interpreter.get_input_details()
output_details= interpreter.get_output_details()interpreter.resize_tensor_input(input_details[0]['index'], (32, 224, 224, 3))
interpreter.resize_tensor_input(output_details[0]['index'], (32, 5))
interpreter.allocate_tensors()input_details = interpreter.get_input_details()
output_details= interpreter.get_output_details()
print("== Input details ==")
print("shape:", input_details[0]['shape'])
print("type:", input_details[0]['dtype'])
print("\n== Output details ==")
print("shape:", output_details[0]['shape'])
print("type:", output_details[0]['dtype'])
== Input details == shape: [ 32 224 224 3] type: <class 'numpy.float32'>== Output details == shape: [32 1] type: <class 'numpy.float32'>
以下决策树可以帮助确定哪种训练后量化方法最适合您的用例。

在我们的例子中,我们使用名为 MobileNetV2 的模型,该模型已经针对低功耗设备进行了优化。所以本例中的权重量化会降低模型精度。
和之前一样,让我们看看这次模型的表现如何。红色将显示与主 TensorFlow 模型不同的预测,蓝色图像将显示两个模型做出相同的预测。作为标签,我们将显示 TensorFlow Lite 模型的预测。
predict_classes(model, interpreter, image_batch)
六、总结
总而言之,在这篇文章中,我们讨论了从 TensorFlow 到 TensorFlow Lite 的转换以及低功耗设备的优化。在下一篇文章中,我们将展示如何在 TensorFlow 2.0 中实现 LeNet-5。