网站开发方向学啥域名大全
CoreImage提供图像处理、人脸识别、图像增强、图像滤镜、图像转场。它操作的数据来自Core Graphics、Core Video、Image IO,使用CPU或GPU进行渲染。CoreImage对底层实现进行封装,为上层提供简单易用的API。
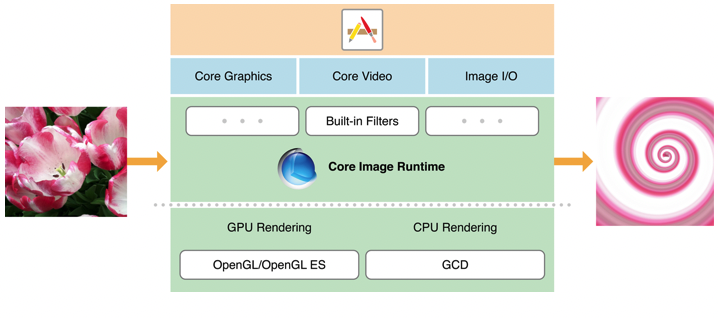
一、CoreImage框架
CoreImage框架分为:渲染层、处理层、API层。其中,渲染层包括GPU渲染(OpenGL和Metal)、CPU渲染(Grand Central Dispatch);处理层有Built-in Filters内建滤镜;API层有Core Graphics、Core Video、Image IO。如下图所示:
二、图像处理
1、图像处理流程
图像处理主要包括三个类:CIContext、CIFilter、CIImage。处理流程示例如下:
import CoreImage// 1、创建CIContext
let context = CIContext()
// 2、创建CIFilter
let filter = CIFilter(name: "CISepiaTone")!
filter.setValue(0.8, forKey: kCIInputIntensityKey)
// 3、创建CIImage
let image = CIImage(contentsOfURL: mURL)
// 4、image应用到filter滤镜
filter.setValue(image, forKey: kCIInputImageKey)
let result = filter.outputImage!
// 5、使用context创建CGImage(用于管理image以及对象复用)
let cgImage = context.createCGImage(result, from: result.extent)
// 6、显示滤镜结果
imageView.image = UIImage(CIImage: result)
2、图像数据类型
图像作为输入输出的Filter,包括数据类型如下:
图像文件的URL或图像数据的NSData;
CGImageRef、UIImage、NSBitmapImageRep对象;
Metal、OpenGl纹理;
CVImageBufferRef、CVPixelBufferRef;
跨进程共享数据的IOSurfaceRef;
内存的Bitmap数据或CIImageProvider;
3、创建Filter Chain
Filter Chain滤镜链的创建,示例代码如下:
func applyFilterChain(to image: CIImage) -> CIImage {// 创建CIFilter,并且设置color滤镜let colorFilter = CIFilter(name: "CIPhotoEffectProcess", withInputParameters:[kCIInputImageKey: image])!// 应用bloom滤镜let bloomImage = colorFilter.outputImage!.applyingFilter("CIBloom",withInputParameters: [kCIInputRadiusKey: 10.0,kCIInputIntensityKey: 1.0])// 图像裁剪let cropRect = CGRect(x: 350, y: 350, width: 150, height: 150)let croppedImage = bloomImage.cropping(to: cropRect)return croppedImage
}
4、应用滤镜到视频
以高斯模糊滤镜应用到视频为例,相关代码如下:
// 创建高斯模糊filter
let filter = CIFilter(name: "CIGaussianBlur")!
let composition = AVVideoComposition(asset: asset, applyingCIFiltersWithHandler: { request inlet source = request.sourceImage.clampingToExtent()filter.setValue(source, forKey: kCIInputImageKey)// 根据时间戳设置模糊系数let seconds = CMTimeGetSeconds(request.compositionTime)filter.setValue(seconds * 10.0, forKey: kCIInputRadiusKey)// 裁剪let output = filter.outputImage!.cropping(to: request.sourceImage.extent)// 应用滤镜结果到视频request.finish(with: output, context: nil)
})
5、使用Metal实时滤镜
首先创建Metal view用于图像渲染:
class ViewController: UIViewController, MTKViewDelegate {// Metal设备、纹理、队列var device: MTLDevice!var commandQueue: MTLCommandQueue!var sourceTexture: MTLTexture!// 高斯模糊var context: CIContext!let filter = CIFilter(name: "CIGaussianBlur")!let colorSpace = CGColorSpaceCreateDeviceRGB()override func viewDidLoad() {super.viewDidLoad()// 创建设备、命令队列device = MTLCreateSystemDefaultDevice()commandQueue = device.newCommandQueue()let view = self.view as! MTKViewview.delegate = selfview.device = deviceview.framebufferOnly = false// 创建CIContextcontext = CIContext(mtlDevice: device)}
}
实时滤镜渲染流程,示例代码如下:
public func draw(in view: MTKView) {if let currentDrawable = view.currentDrawable {let commandBuffer = commandQueue.commandBuffer()// 1、使用纹理创建UIImage,并且进行滤镜let inputImage = CIImage(mtlTexture: sourceTexture)!filter.setValue(inputImage, forKey: kCIInputImageKey)filter.setValue(20.0, forKey: kCIInputRadiusKey)// 2、使用context进行渲染context.render(filter.outputImage!,to: currentDrawable.texture,commandBuffer: commandBuffer,bounds: inputImage.extent,colorSpace: colorSpace)// 3、使用buffer显示结果commandBuffer.present(currentDrawable)commandBuffer.commit()}
}
三、人脸识别
iOS提供CIDetector进行人脸识别,示例代码如下:
// 1、创建CIContext
CIContext *context = [CIContext context];
// 2、创建options,指定识别精度
NSDictionary *opts = @{ CIDetectorAccuracy : CIDetectorAccuracyHigh };
// 3、创建检测器,指定识别类型
CIDetector *detector = [CIDetector detectorOfType:CIDetectorTypeFacecontext:contextoptions:opts];
// 4、指定图像方向
opts = @{ CIDetectorImageOrientation :[[mImage properties] valueForKey:kCGImagePropertyOrientation] };
// 5、获取识别结果
NSArray *features = [detector featuresInImage:mImage options:opts];
人脸识别结果包含:左眼、右眼、嘴巴的位置,结果判断如下:
for (CIFaceFeature *f in features) {NSLog(@"%@", NSStringFromRect(f.bounds));if (f.hasLeftEyePosition) {NSLog(@"Left eye x=%g y=%g", f.leftEyePosition.x, f.leftEyePosition.y);}if (f.hasRightEyePosition) {NSLog(@"Right eye x=%g y=%g", f.rightEyePosition.x, f.rightEyePosition.y);}if (f.hasMouthPosition) {NSLog(@"Mouth x=%g y=%g", f.mouthPosition.x, f.mouthPosition.y);}
}
我们来看下人脸识别效果:

四、图像增强
iOS提供的图像增强包括:红眼矫正、脸部平衡、色彩增强、阴影突出,如下表所示:
| Filter | 描述 |
| CIRedEyeCorrection | 修复摄像头闪光引起的红眼 |
| CIFaceBalance | 根据肤色调整脸部颜色 |
| CIVibrance | 增强饱和度 |
| CIToneCurve | 调整对比度 |
| CIHighlightShadowAdjust | 调整阴影细节 |
图像增强的使用示例如下:
NSDictionary *options = @{ CIDetectorImageOrientation :[[image properties] valueForKey:kCGImagePropertyOrientation] };
NSArray *adjustments = [image autoAdjustmentFiltersWithOptions:options];
for (CIFilter *filter in adjustments) {[filter setValue:image forKey:kCIInputImageKey];myImage = filter.outputImage;
}