h5网站免费建设2024年新冠疫情最新消息
文章目录
- 一、前言
- 二、前期工作
- 1. 设置GPU(如果使用的是CPU可以忽略这步)
- 二、什么是生成对抗网络
- 1. 简单介绍
- 2. 应用领域
- 三、网络结构
- 四、构建生成器
- 五、构建鉴别器
- 六、训练模型
- 1. 保存样例图片
- 2. 训练模型
- 七、生成动图
一、前言
我的环境:
- 语言环境:Python3.6.5
- 编译器:jupyter notebook
- 深度学习环境:TensorFlow2.4.1
往期精彩内容:
- 卷积神经网络(CNN)实现mnist手写数字识别
- 卷积神经网络(CNN)多种图片分类的实现
- 卷积神经网络(CNN)衣服图像分类的实现
- 卷积神经网络(CNN)鲜花识别
- 卷积神经网络(CNN)天气识别
- 卷积神经网络(VGG-16)识别海贼王草帽一伙
- 卷积神经网络(ResNet-50)鸟类识别
- 卷积神经网络(AlexNet)鸟类识别
- 卷积神经网络(CNN)识别验证码
- 卷积神经网络(Inception-ResNet-v2)交通标志识别
来自专栏:机器学习与深度学习算法推荐
二、前期工作
1. 设置GPU(如果使用的是CPU可以忽略这步)
import tensorflow as tfgpus = tf.config.list_physical_devices("GPU")if gpus:tf.config.experimental.set_memory_growth(gpus[0], True)  #设置GPU显存用量按需使用tf.config.set_visible_devices([gpus[0]],"GPU")# 打印显卡信息,确认GPU可用
print(gpus)
from tensorflow.keras import layers, datasets, Sequential, Model, optimizers
from tensorflow.keras.layers import LeakyReLU, UpSampling2D, Conv2Dimport matplotlib.pyplot as plt
import numpy             as np
import sys,os,pathlib
img_shape  = (28, 28, 1)
latent_dim = 200
二、什么是生成对抗网络
1. 简单介绍
生成对抗网络(GAN) 包含生成器和判别器,两个模型通过对抗训练不断学习、进化。
生成器(Generator):生成数据(大部分情况下是图像),目的是“骗过”判别器。鉴别器(Discriminator):判断这张图像是真实的还是机器生成的,目的是找出生成器生成的“假数据”。
2. 应用领域
GAN 的应用十分广泛,它的应用包括图像合成、风格迁移、照片修复以及照片编辑,数据增强等等。
1)风格迁移
图像风格迁移是将图像A的风格转换到图像B中去,得到新的图像。
2)图像生成
GAN 不但能生成人脸,还能生成其他类型的图片,比如漫画人物。
三、网络结构
简单来讲,就是用生成器生成手写数字图像,用鉴别器鉴别图像的真假。二者相互对抗学习(卷),在对抗学习(卷)的过程中不断完善自己,直至生成器可以生成以假乱真的图片(鉴别器无法判断其真假)。结构图如下:
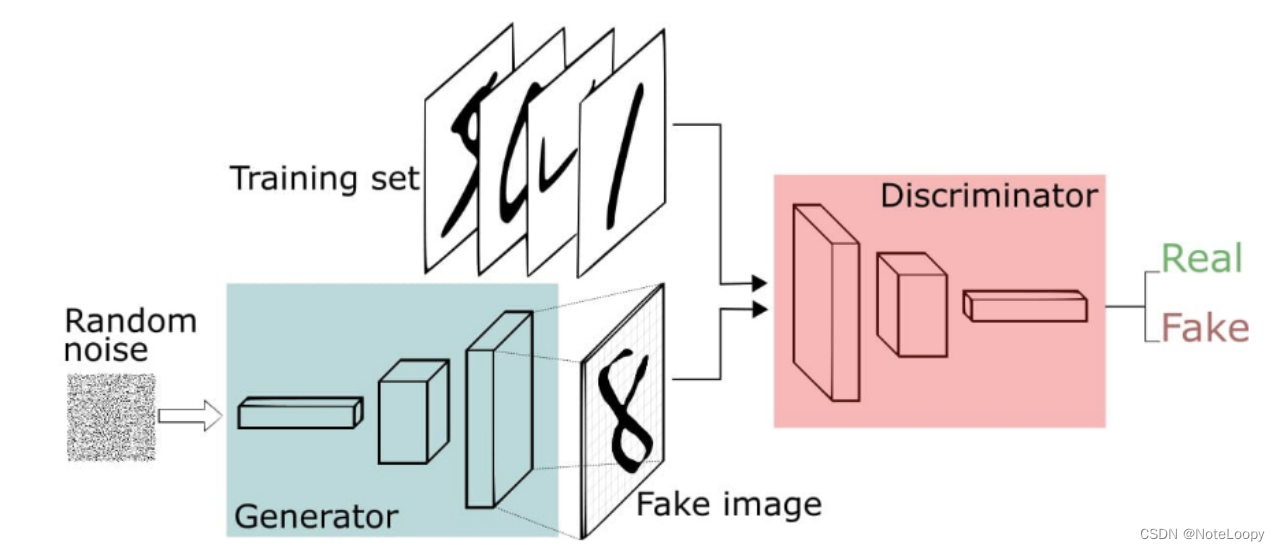
GAN步骤:
- 1.生成器(Generator)接收随机数并返回生成图像。
- 2.将生成的数字图像与实际数据集中的数字图像一起送到鉴别器(Discriminator)。
- 3.鉴别器(Discriminator)接收真实和假图像并返回概率,0到1之间的数字,1表示真,0表示假。
四、构建生成器
def build_generator():# ======================================= ## 生成器,输入一串随机数字生成图片# ======================================= #model = Sequential([layers.Dense(256, input_dim=latent_dim),layers.LeakyReLU(alpha=0.2), # 高级一点的激活函数layers.BatchNormalization(momentum=0.8), # BN 归一化layers.Dense(512),layers.LeakyReLU(alpha=0.2),layers.BatchNormalization(momentum=0.8),layers.Dense(1024),layers.LeakyReLU(alpha=0.2),layers.BatchNormalization(momentum=0.8),layers.Dense(np.prod(img_shape), activation='tanh'),layers.Reshape(img_shape)])noise = layers.Input(shape=(latent_dim,))img = model(noise)return Model(noise, img)
五、构建鉴别器
def build_discriminator():# ===================================== ## 鉴别器,对输入的图片进行判别真假# ===================================== #model = Sequential([layers.Flatten(input_shape=img_shape),layers.Dense(512),layers.LeakyReLU(alpha=0.2),layers.Dense(256),layers.LeakyReLU(alpha=0.2),layers.Dense(1, activation='sigmoid')])img = layers.Input(shape=img_shape)validity = model(img)return Model(img, validity)
# 创建判别器
discriminator = build_discriminator()
# 定义优化器
optimizer = tf.keras.optimizers.Adam(1e-4)
discriminator.compile(loss='binary_crossentropy',optimizer=optimizer,metrics=['accuracy'])# 创建生成器
generator = build_generator()
gan_input = layers.Input(shape=(latent_dim,))
img = generator(gan_input)# 对生成的假图片进行预测
validity = discriminator(img)
combined = Model(gan_input, validity)
combined.compile(loss='binary_crossentropy', optimizer=optimizer)
六、训练模型
1. 保存样例图片
def sample_images(epoch):"""保存样例图片"""row, col = 4, 4noise = np.random.normal(0, 1, (row*col, latent_dim))gen_imgs = generator.predict(noise)fig, axs = plt.subplots(row, col)cnt = 0for i in range(row):for j in range(col):axs[i,j].imshow(gen_imgs[cnt, :,:,0], cmap='gray')axs[i,j].axis('off')cnt += 1fig.savefig("images/%05d.png" % epoch)plt.close()
2. 训练模型
train_on_batch:函数接受单批数据,执行反向传播,然后更新模型参数,该批数据的大小可以是任意的,即,它不需要提供明确的批量大小,属于精细化控制训练模型。
def train(epochs, batch_size=128, sample_interval=50):# 加载数据(train_images,_), (_,_) = tf.keras.datasets.mnist.load_data()# 将图片标准化到 [-1, 1] 区间内 train_images = (train_images - 127.5) / 127.5# 数据train_images = np.expand_dims(train_images, axis=3)# 创建标签true = np.ones((batch_size, 1))fake = np.zeros((batch_size, 1))# 进行循环训练for epoch in range(epochs): # 随机选择 batch_size 张图片idx = np.random.randint(0, train_images.shape[0], batch_size)imgs = train_images[idx] # 生成噪音noise = np.random.normal(0, 1, (batch_size, latent_dim))# 生成器通过噪音生成图片,gen_imgs的shape为:(128, 28, 28, 1)gen_imgs = generator.predict(noise)# 训练鉴别器 d_loss_true = discriminator.train_on_batch(imgs, true)d_loss_fake = discriminator.train_on_batch(gen_imgs, fake)# 返回loss值d_loss = 0.5 * np.add(d_loss_true, d_loss_fake)# 训练生成器noise = np.random.normal(0, 1, (batch_size, latent_dim))g_loss = combined.train_on_batch(noise, true)print ("%d [D loss: %f, acc.: %.2f%%] [G loss: %f]" % (epoch, d_loss[0], 100*d_loss[1], g_loss))# 保存样例图片if epoch % sample_interval == 0:sample_images(epoch)
train(epochs=30000, batch_size=256, sample_interval=200)
七、生成动图
如果报错:ModuleNotFoundError: No module named 'imageio' 可以使用:pip install imageio 安装 imageio 库。
import imageiodef compose_gif():# 图片地址data_dir = "images_old"data_dir = pathlib.Path(data_dir)paths = list(data_dir.glob('*'))gif_images = []for path in paths:print(path)gif_images.append(imageio.imread(path))imageio.mimsave("test.gif",gif_images,fps=2)compose_gif()