优网营销杭州网站seo
这篇文章,主要介绍如何使用Spring Cloud微服务组件从0到1搭建一个微服务工程。
目录
一、从0到1搭建微服务工程
1.1、基础环境说明
(1)使用组件
(2)微服务依赖
1.2、搭建注册中心
(1)引入依赖
(2)配置文件
(3)启动类
1.3、搭建配置中心
(1)引入依赖
(2)配置文件
(3)启动类
1.4、搭建API网关
(1)引入依赖
(2)配置文件
(3)启动类
1.5、搭建服务提供者
(1)引入依赖
(2)配置文件
(3)启动类
1.6、搭建服务消费者
(1)引入依赖
(2)配置文件
(3)启动类
1.7、运行测试
一、从0到1搭建微服务工程
1.1、基础环境说明
(1)使用组件
这里主要是使用的Spring Cloud Netflix微服务组件搭建工程,其中需要搭建下面这些组件工程:
- 注册中心:采用Eureka实现注册中心。
- 配置中心:采用Spring Cloud Config实现配置中心。
- API网关:采用Spring Cloud Gateway作为网关。
- 服务调用:采用OpenFeign实现服务之间的调用。
- 负载均衡:采用Ribbon实现服务的负载均衡。
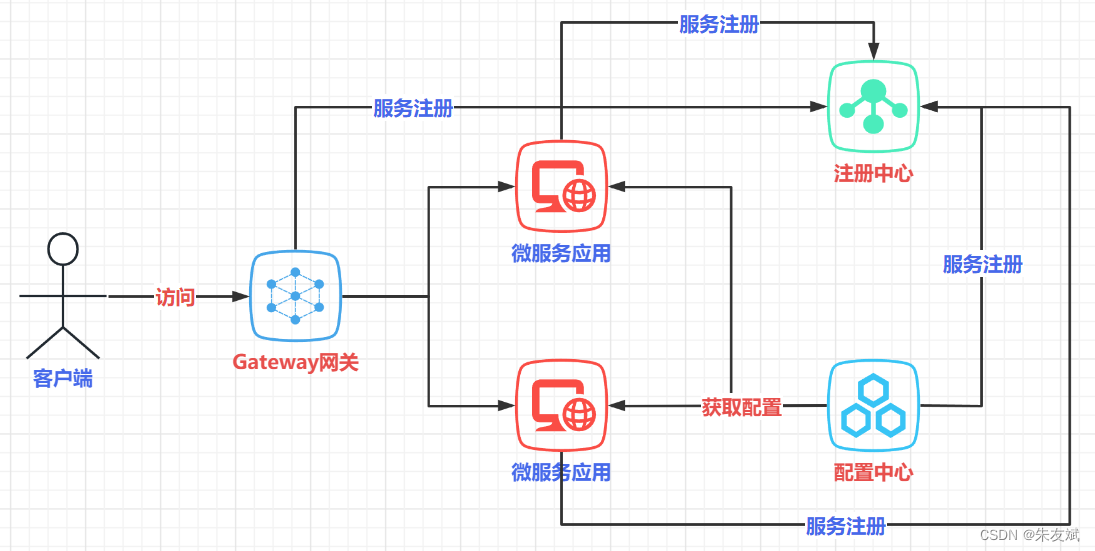
大致如下所示:
工程代码结构:

(2)微服务依赖
<!-- 引入SpringBoot依赖 -->
<parent><groupId>org.springframework.boot</groupId><artifactId>spring-boot-starter-parent</artifactId><version>2.3.12.RELEASE</version><relativePath/> <!-- lookup parent from repository -->
</parent><dependencyManagement><!-- 使用 dependencyManagement 依赖管理,统一管理组件的版本 --><dependencies><!-- 引入 SpringCloud 微服务依赖 --><dependency><groupId>org.springframework.cloud</groupId><artifactId>spring-cloud-dependencies</artifactId><version>Hoxton.SR12</version><type>pom</type><scope>import</scope></dependency></dependencies>
</dependencyManagement><build><plugins><plugin><groupId>org.springframework.boot</groupId><artifactId>spring-boot-maven-plugin</artifactId></plugin></plugins>
</build>
1.2、搭建注册中心
这里采用单机的Eureka注册中心,当然也可以使用集群的Eureka注册中心。
(1)引入依赖
<!-- 引入 eureka 服务端依赖 -->
<dependency><groupId>org.springframework.cloud</groupId><artifactId>spring-cloud-starter-netflix-eureka-server</artifactId>
</dependency>
(2)配置文件
server:port: 8761
spring:application:name: cloud-eureka-server
# 配置 eureka 服务端
eureka:client:register-with-eureka: false # 是否将自己注册到eureka注册中心fetch-registry: false # 是否从eureka注册中心获取注册信息
(3)启动类
package com.gitcode.demo;import org.springframework.boot.SpringApplication;
import org.springframework.boot.autoconfigure.SpringBootApplication;
import org.springframework.cloud.netflix.eureka.server.EnableEurekaServer;/*** @version 1.0.0* @Date: 2023/4/26 20:27* @Copyright (C) ZhuYouBin* @Description: Eureka 注册中心服务端启动类*/
@EnableEurekaServer
@SpringBootApplication
public class EurekaApp {public static void main(String[] args) {SpringApplication.run(EurekaApp.class, args);}
}
1.3、搭建配置中心
采用Spring Cloud Config组件实现配置中心的功能。
(1)引入依赖
<!-- 引入 eureka 客户端依赖 -->
<dependency><groupId>org.springframework.cloud</groupId><artifactId>spring-cloud-starter-netflix-eureka-client</artifactId>
</dependency>
<!-- 引入 config-server 服务端依赖 -->
<dependency><groupId>org.springframework.cloud</groupId><artifactId>spring-cloud-config-server</artifactId>
</dependency>
(2)配置文件
server:port: 8888
spring:application:name: cloud-config-servercloud:config:server:git:uri: https://gitcode.net/qq_39826207/config-demo.git # Git仓库的地址
#          username: # Git仓库的登录用户名称
#          password: # Git仓库的登录密码
#          default-label: # 默认访问的分支名称
#          search-paths: # 搜索的根目录,从仓库中的哪个目录中开始查找配置文件# eureka 配置
eureka:instance:hostname: ${spring.application.name}prefer-ip-address: true # 开启采用 IP 注册形式# ${spring.cloud.client.ip-address} 这个属性可以获取到当前机器的 IP 地址instance-id: ${spring.cloud.client.ip-address}:${server.port} # 设置当前服务的实例ID,采用:IP+端口形式client:register-with-eureka: true # 是否将自己注册到eureka注册中心fetch-registry: true # 是否从eureka注册中心获取注册信息service-url:defaultZone: http://localhost:8761/eureka/ # eureka服务端的地址
(3)启动类
package com.gitcode.demo;import org.springframework.boot.SpringApplication;
import org.springframework.boot.autoconfigure.SpringBootApplication;
import org.springframework.cloud.config.server.EnableConfigServer;
import org.springframework.cloud.netflix.eureka.EnableEurekaClient;/*** @version 1.0.0* @Date: 2023/4/26 20:37* @Copyright (C) ZhuYouBin* @Description: Config 配置中心服务端启动类*/
@EnableConfigServer
@EnableEurekaClient
@SpringBootApplication
public class ConfigApp {public static void main(String[] args) {SpringApplication.run(ConfigApp.class, args);}
}
1.4、搭建API网关
采用Spring Cloud Gateway实现API网关的功能。
(1)引入依赖
<!-- 引入 eureka 客户端依赖 -->
<dependency><groupId>org.springframework.cloud</groupId><artifactId>spring-cloud-starter-netflix-eureka-client</artifactId>
</dependency>
<!-- 引入 Gateway 依赖 -->
<dependency><groupId>org.springframework.cloud</groupId><artifactId>spring-cloud-starter-gateway</artifactId>
</dependency>
(2)配置文件
server:port: 8080
spring:application:name: cloud-api-gatewaycloud:gateway:# 动态服务转发discovery:locator:enabled: true # 启用动态路由服务名称转发功能lower-case-service-id: true # 开启服务名称小写# eureka 配置
eureka:instance:hostname: ${spring.application.name}prefer-ip-address: true # 开启采用 IP 注册形式# ${spring.cloud.client.ip-address} 这个属性可以获取到当前机器的 IP 地址instance-id: ${spring.cloud.client.ip-address}:${server.port} # 设置当前服务的实例ID,采用:IP+端口形式client:register-with-eureka: true # 是否将自己注册到eureka注册中心fetch-registry: true # 是否从eureka注册中心获取注册信息service-url:defaultZone: http://localhost:8761/eureka/ # eureka服务端的地址
(3)启动类
package com.gitcode.demo;import org.springframework.boot.SpringApplication;
import org.springframework.boot.autoconfigure.SpringBootApplication;
import org.springframework.cloud.netflix.eureka.EnableEurekaClient;/*** @version 1.0.0* @Date: 2023/4/26 20:49* @Copyright (C) ZhuYouBin* @Description: Gateway 网关启动类*/
@EnableEurekaClient
@SpringBootApplication
public class GatewayApp {public static void main(String[] args) {SpringApplication.run(GatewayApp.class, args);}
}
1.5、搭建服务提供者
(1)引入依赖
<!-- 引入 web 依赖 -->
<dependency><groupId>org.springframework.boot</groupId><artifactId>spring-boot-starter-web</artifactId>
</dependency>
<!-- 引入 eureka 客户端依赖 -->
<dependency><groupId>org.springframework.cloud</groupId><artifactId>spring-cloud-starter-netflix-eureka-client</artifactId>
</dependency>
<!-- 引入 config-client 客户端依赖 -->
<dependency><groupId>org.springframework.cloud</groupId><artifactId>spring-cloud-config-client</artifactId>
</dependency>
(2)配置文件
- 注意:这里创建的配置文件必须是【bootstrap.yml】,因为需要从配置中心获取配置信息。
server:port: 6250
spring:application:name: biz-providercloud:config:name: biz-provider # 从 Git 仓库获取的配置文件名称label: master # 从哪个分支获取profile: dev # 获取哪个环境下的配置文件# 从注册中心获取配置信息discovery:enabled: true # 开启服务发现的功能,这里也就是支持eureka的功能service-id: cloud-config-server # config server服务端的微服务应用名称
(3)启动类
package com.gitcode.demo;import org.springframework.boot.SpringApplication;
import org.springframework.boot.autoconfigure.SpringBootApplication;
import org.springframework.cloud.netflix.eureka.EnableEurekaClient;/*** @version 1.0.0* @Date: 2023/4/26 20:57* @Copyright (C) ZhuYouBin* @Description: 服务提供者启动类*/
@EnableEurekaClient
@SpringBootApplication
public class ProviderApp {public static void main(String[] args) {SpringApplication.run(ProviderApp.class, args);}
}
1.6、搭建服务消费者
服务消费者需要调用服务提供者的接口,所以这里需要引入OpenFeign组件。
(1)引入依赖
<!-- 引入 web 依赖 -->
<dependency><groupId>org.springframework.boot</groupId><artifactId>spring-boot-starter-web</artifactId>
</dependency>
<!-- 引入 eureka 客户端依赖 -->
<dependency><groupId>org.springframework.cloud</groupId><artifactId>spring-cloud-starter-netflix-eureka-client</artifactId>
</dependency>
<!-- 引入 config-client 客户端依赖 -->
<dependency><groupId>org.springframework.cloud</groupId><artifactId>spring-cloud-config-client</artifactId>
</dependency>
<!-- 引入 OpenFeign 依赖 -->
<dependency><groupId>org.springframework.cloud</groupId><artifactId>spring-cloud-starter-openfeign</artifactId>
</dependency>
(2)配置文件
- 注意:这里创建的配置文件必须是【bootstrap.yml】,因为需要从配置中心获取配置信息。
server:port: 9527
spring:application:name: biz-consumercloud:config:name: biz-consumer # 从 Git 仓库获取的配置文件名称label: master # 从哪个分支获取profile: dev # 获取哪个环境下的配置文件# 从注册中心获取配置信息discovery:enabled: true # 开启服务发现的功能,这里也就是支持eureka的功能service-id: cloud-config-server # config server服务端的微服务应用名称
(3)启动类
package com.gitcode.demo;import org.springframework.boot.SpringApplication;
import org.springframework.boot.autoconfigure.SpringBootApplication;
import org.springframework.cloud.netflix.eureka.EnableEurekaClient;
import org.springframework.cloud.openfeign.EnableFeignClients;/*** @version 1.0.0* @Date: 2023/4/26 21:11* @Copyright (C) ZhuYouBin* @Description: 服务消费者启动类*/
@EnableFeignClients
@EnableEurekaClient
@SpringBootApplication
public class ConsumerApp {public static void main(String[] args) {SpringApplication.run(ConsumerApp.class, args);}
}
1.7、运行测试
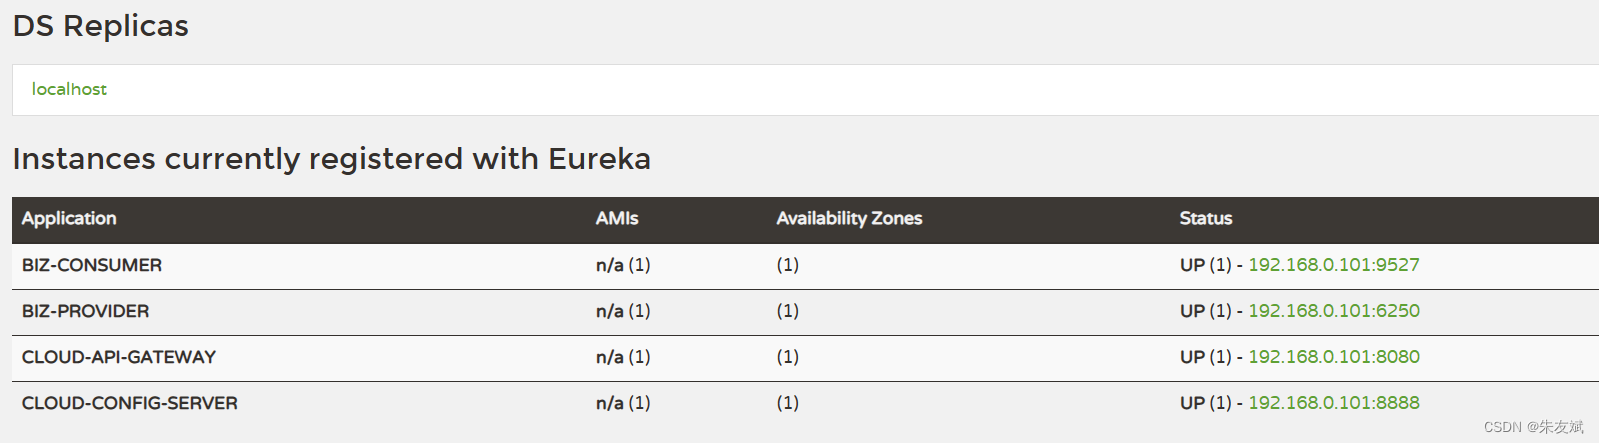
依次启动Eureka注册中心、Config配置中心、Gateway网关、Consumer服务消费者、Provider服务提供者,查看注册中心是否正常。
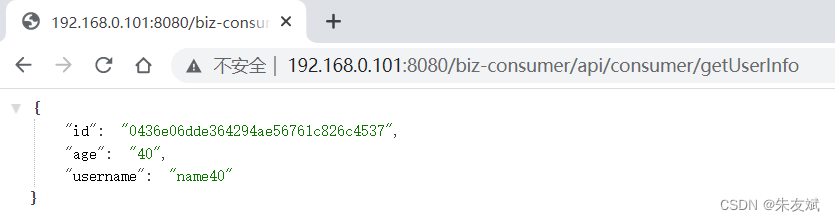
浏览器,通过Gateway访问Consumer消费者工程中的接口【http://localhost:8080/biz-consumer/api/consumer/getUserInfo】,注意:测试接口的代码没有贴出来,可以到我的代码仓库里面查看。
到此,从0到1的微服务工程搭建完成。
综上,这篇文章结束了,主要介绍如何使用Spring Cloud微服务组件从0到1搭建一个微服务工程【源代码】。